Top Menu

Category Archives Tech

Within the last week I have finally built a new PC. Here’s the PCPartPicker list: https://pcpartpicker.com/list/ZMfWKZ

The whole build ending up costing me $1,851.67 without taxes. All free shipping.

  • Intel i7 6700k Overclocked 4.6Ghz Skylake Processor
  • ASUS ROG MAXIMUS VIII HERO ALPHA Motherboard
  • ASUS ROG GeForce GTX 1080 STRIX 8GB Graphics Card
  • G.SKILL TridentZ Series 32GB DDR4 3200 Memory
  • Corsair Graphite Series 760T Full Tower Windowed White Case
  • Corsair Hydro Series H100i v2 CPU Cooler
  • Corsair RM850X Power Supply
  • Samsung 850 EVO 1TB M.2
  • LG WH14NS40 Blu-Ray Writer
  • Asus VG248QE 24″ 1920×1080 144Hz Monitor

My existing hardware I’ll be using with this still:

  • Corsair Vengeance K70 Black Cherry MX Brown’s Keyboard
  • Logitech Proteus Spectrum G502 Mouse
  • Samsung 850 EVO 250GB SSD (OS Drive)

Farewell to my old PC:

  • Intel i7 860 Lynnfield Processor (Overclocked to 3.8Ghz)
  • EVGA P55 FTW SLI Intel Motherboard
  • EVGA GeForce GTX 750 Ti FTW 2GB Graphics Card
  • G.SKILL Ripjaws 16GB Memory
  • Antec P180 Case
  • Corsair Hydro Series H60 CPU Cooler
  • Corsair RM850X Power Supply

On March 31st, 2016 you will no longer be able to use Chrome to Phone. Google decided to (sadly) get rid of it a while back. You also may even be aware that Google is advertising another way to still send items to your phone and that’s by typing in “Send a note to my phone” but this feature has actually not worked since November 2015 and it’s now the very end of February of 2016. There are a bunch of posts about this same issue by others on the Google Forums but apparently there’s not a Google employee that ever used either Chrome to Phone or the newly advertised replacement “send a note.” Odd right?

Well a while back I remember a post on the XDA-Developers forums from someone making a replacement for Chrome to Phone. Since Chrome to Phone will stop working in a month, I decided to revisit this application and see it’s progress, I’m glad I did. It’s an exact replica of Chrome to Phone and I love it.

In order to follow the steps in this guide you will need to first make sure you have turned on USB debugging (see bottom of guide) and have installed the PC ADB drivers (troubles? see bottom of guide).

  1. Download this file containing all the necessary files needed.
  2. Extract the files from the zip file.
  3. Open the folder location you extracted the contents to.
  4. Run the file named “1-install-Play-Store.bat” and simply follow the instructions.
  5. When completed, reboot the device and you will now have all the necessary Google apps.

Enjoy!

Questions and Help?

First you need to enable Developer Options if you haven’t already, you can do this by going to Settings > Device Options and then tap on Serial Number several times. Then once they have been enabled, go into Developer Options and enable USB debugging by checking “Enable ADB.”

Second you need to make sure you have installed ADB and PC ADB drivers on your computer, you can install them by downloading them from here. If you have problems installing those, then install this alternative set instead from here.

Once that is installed, connect your Fire to your computer and open up Command Prompt to use the following ADB commands and type in the following:

adb shell
pm hide com.amazon.kindle.kso
exit
adb reboot

That’s it. You should no longer see anymore ads on your lock screen.

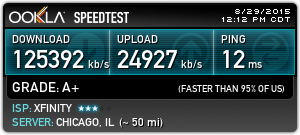
Comcast just recently upgraded everyone’s internet speeds for free in June, so I was getting 90 Mbps downstream / 12 Mbps upstream since I had the Blast! package.

Now I’m blazing with 125 Mbps downstream / 25 Mbps upstream having changed my package today. The increased upload speeds are definitely the best part of this upgrade for me.

4620880809

Here are essential Chrome Extensions that I believe most types of users should have installed, rather it be to enhance their experience or for security/privacy/etc reasons.

Here are 3 possible fixes for the ntoskrnl.exe memory leak on Windows 10.

  1. Update your Network Drivers.
  2. Go into your registry via regedit and navigate to “HKEY_LOCAL_MACHINE\SYSTEM\CurrentControlSet\Services\Ndu” and edit DWORD “Start” and change the value from 2 to 4.
  3. Disable “Show me tips about Windows” under Settings > System > Notifications & actions.

Any of these changes will require a system restart afterwards to come into effect.

Hopefully you see the problem has been fixed or a drop in its memory usage.

If you are looking for a way to get your “Details” moved back to the bottom pane then use this safe tool that doesn’t modify any system files and is easy to install and uninstall.

It comes with a few other features as well that may or may not be useful to you.

The tool is called OldNewExplorer and can be used for Windows 10, 8.1 or 8. It’s a shell extension / tweaker which can undo “improvements” to file browsing made in newer Windows version. Everything is optional for your liking.

Download it here (and more details/features): OldNewExplorer

2 years ago, I preordered the Galaxy S4. Then the Galaxy S5 was announced and I preordered that too, especially for the camera.

Now the Galaxy S6 is coming out, of course, we all know a yearly release. I’ve owned the Galaxy S (Vibrant), the S4 and S5 and now I really want the S6.

I’m pretty sure I’ll get it, and here are the leaked specs for the phone, highlighted in bold are a big deal to me now:

  • 64-bit eight-core 14nm CPU which is 50 percent faster
  • 5.1-inch Quad HD Super AMOLED display with a 577ppi density, stunning outdoor visibility, super dim mode for late night.
  • A huge 20 megapixel OIS camera sensor and a 5 megapixel f/1.8 front-facing camera with real-time HDR
  • 32 / 64 / 128GB of storage
  • 2550mAh battery
  • Built-in wireless charging
  • Four hours of usage on a 10 minute charge
  • Quick connect charging
  • Samsung Pay: works with 90 percent of existing magnetic stripe payment terminals, and NFC payment terminals
  • Metal and glass body
  • Gorilla Glass 4
  • Cat 6 LTE

Source: BGR

This root method should work with similar RCA tablets and other alike tablets that were released over Black Friday 2014.

The main method to root is with a tool called Kingo Root, available to download from http://kingoapp.com. Here is a mirror for this file is ever necessary: android_root.exe

  • Step 1: Download and Install Kingo Root
  • Step 2: Turn on USB Debugging on your RCA or like tablet.
    • In order to do this you need to turn on Developer Options by going into the Settings Menu and going down to “About phone”. After that, scroll down until you find “Build number” and tap this seven times in a row until you get a dialog telling you that Developer Options have been turned on.
  • Step 3: Plug in your RCA or like tablet via USB into your computer.
    • You might need to install the USB drivers at this point for your device to be recognized. It should auto install after plugging in your RCA or like tablet.
  • Step 4: Open Kingo Root and follow the instructions to root the device.
  • Step 5: Profit! You are now rooted. If you’re not sure what to do with root or what you can, you can start by improving your battery life by installing Xposed Framework with Amplify and Greenify.
Close